Table of Contents
Start Menu Layout (Windows 10)
- It seems like the only way to set the initial start tile layout is to force the layout using group policy. This has the advantage that it is static meaning that it can not be changed. So for restricted users like students this might be a good thing, but for staff it is less than desirable.
AD GPO Method
Setup
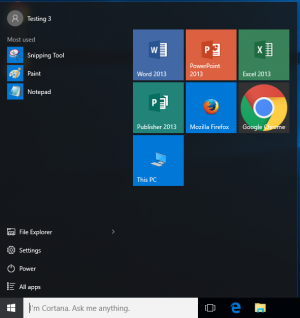
- First customize your start menu tiles until they are arranged to your liking.
- Then open Powershell
- In powershell run the command
Export-StartLayout -Path C:\Users\defaultstartlayout.xml
- Then open gpedit.msc (local) or the your target gpo in Group Policy Management (ADS)
- Go to User Configuration > Administrative Templates > Start Menu and Taskbar
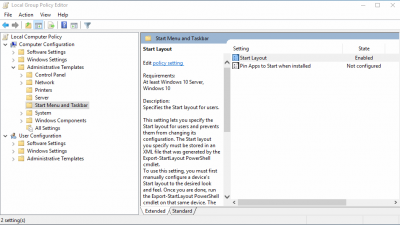
- Then edit Start Screen Layout
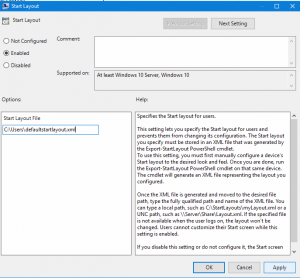
- Enable the policy and put the path of the xml file you exported in step 3 (C:\Users\defaultstartlayout.xml for this example)


Default User/ Import Layout Method
- It is possible to update the Default profile “C:\Users\Default” to have a custom start menu layout. The process is pretty straightforward simply export your current start menu layout in Powershell then import the resultant XML file into the default user profile. This method has the benefit that new users can modify their start menu unlike forcing the start menu through GPO policy.
- Setup your start menu as you would like for new users. Be sure no do put folders or files located in your profile like your “Documents” folder since they point to the folder in your profile not the symbolic Documents folder. This is a example of what I used for my business lab
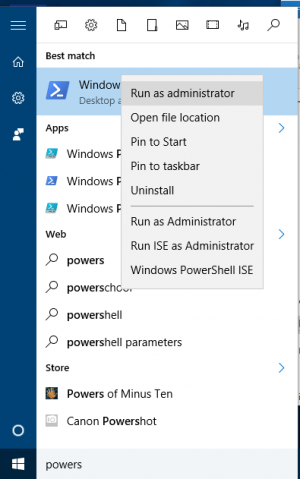
- Start powershell as administrator (this is required since we need to modify the default user profile)
- Run the following in powershell
Export-StartLayout -Path C:\custom_layout.xml
- Here is a example of the xml file
- custom_layout.xml
<LayoutModificationTemplate Version="1" xmlns="http://schemas.microsoft.com/Start/2014/LayoutModification">
  <LayoutOptions StartTileGroupCellWidth="6" />
  <DefaultLayoutOverride>
    <StartLayoutCollection>
      <defaultlayout:StartLayout GroupCellWidth="6" xmlns:defaultlayout="http://schemas.microsoft.com/Start/2014/FullDefaultLayout">
        <start:Group Name="" xmlns:start="http://schemas.microsoft.com/Start/2014/StartLayout">
          <start:DesktopApplicationTile Size="2x2" Column="0" Row="0" DesktopApplicationID="{6D809377-6AF0-444B-8957-A3773F02200E}\Microsoft Office\Office15\WINWORD.EXE" />
          <start:DesktopApplicationTile Size="2x2" Column="2" Row="0" DesktopApplicationID="{6D809377-6AF0-444B-8957-A3773F02200E}\Microsoft Office\Office15\POWERPNT.EXE" />
          <start:DesktopApplicationTile Size="2x2" Column="4" Row="0" DesktopApplicationID="{6D809377-6AF0-444B-8957-A3773F02200E}\Microsoft Office\Office15\EXCEL.EXE" />
          <start:DesktopApplicationTile Size="2x2" Column="0" Row="2" DesktopApplicationID="{6D809377-6AF0-444B-8957-A3773F02200E}\Microsoft Office\Office15\MSPUB.EXE" />
          <start:DesktopApplicationTile Size="2x2" Column="2" Row="2" DesktopApplicationID="{7C5A40EF-A0FB-4BFC-874A-C0F2E0B9FA8E}\Mozilla Firefox\firefox.exe" />
          <start:DesktopApplicationTile Size="2x2" Column="4" Row="2" DesktopApplicationID="Chrome" />
          <start:DesktopApplicationTile Size="2x2" Column="0" Row="4" DesktopApplicationID="Microsoft.Windows.Computer" />
        </start:Group>
      </defaultlayout:StartLayout>
    </StartLayoutCollection>
  </DefaultLayoutOverride>
</LayoutModificationTemplate>
- Lastly Import the xml file to your default user profile
Import-StartLayout -LayoutPath C:\custom_layout.xml -MountPath $env:SystemDrive\


— Thad Schulz 2015/11/25 10:37